Lavender and Lemon Swirl Cookies

Crazy-About-Cooking-Lavender-and-Lemon-Swirls-Featured-Image

It seems like lavender is everywhere in recipes at the moment and I have to confess, I’ve been very keen to try a few concoctions of my own with it. When the lovely Karina kindly offered me some that she had, I jumped at the chance and created these delightful cookies.

Crazy-About-Cooking-Lavender-and-Lemon SwirlsIngredients

  • 125gm butter
  • 2/3 cup caster sugar
  • 1 egg
  • 2 cups plain flour
  • 1/2 cup plain flour (this is extra flour that you may or may not need depending on how wet your dough mix is)
  • 2 tsps lavender
  • 2 tsps lemon juice
  • 10 drops purple food colouring (you can make these without the food colouring but they wind up just looking gritty rather than a lovely purple)

Method

Whip the butter with either a hand mixer or food processor. Add the sugar and continue mixing until they are thoroughly creamed. I like to do this separately, rather than just putting the butter and the sugar in to begin with – I think it creates a lighter final cookie.

Add the egg and beat until well combined.

Divide the mix in two and set one half aside.

Working with one of the batches, add the lemon juice, and one cup of the plain flour and mix together to form a soft dough. You may need to add more flour at this point to make it come together, depending on how old your flour is and the weather conditions when you’re making these. Pat the dough a ball, wrap in cling wrap and set aside.

Wipe your food processor out with some paper towel to get rid of most of the moisture.

Put the lavender in the food processor and whizz until it’s coarsely ground up (or use a bullet blender or mortar and pestle).

Next add the remaining butter/sugar/egg mix, the food colouring and 1 cup of flour to form a soft dough. Again, you may need to add extra flour to get the right consistency here. The dough should be pliable and not sticky. Don’t worry if it seems aggressively purple at this point – it will lighten up as it cooks.

Wrap in cling wrap and set aside for about 15 minutes. Unless it’s the height of summer, I don’t like to refrigerate the dough at this point as it becomes too hard to work with.

Crazy-About-Cooking-Unbaked-Lavender-and-Lemon-SwirlsThe pinwheels are made by rolling both batches of dough out into rectangles, laying one on the other and then rolling them up together to make a log.

Once you have your log, wrap it in your baking paper and then cling wrap and pop it in the fridge to chill for at least 30 minutes and up to 2 weeks. You can literally make a roll of cookie dough once every couple of weeks and slice some rounds off when you want fresh cookies. It’s fantastic!

When you’re ready to bake, cut the log into slices, bearing in mind that the cookies will stay roughly the thickness that you cut them at. Because these use plain flour they don’t tend to rise much at all.

Crazy-About-Cooking-Lavender-and-Lemon-Swirls-2

Bake for 10-12 minutes at 180 degrees Celsius on a cookie sheet lined with baking paper.

Cool on a wire rack and enjoy.

The Best Banana Bread

Crazy-About-Cooking-Banana_bread-Featured-Image

Crazy-About-Cooking-The-Best-Banana BreadThis beautiful, super simple banana bread is adapted from Australian Chef Karen Martini’s cookbook New Kitchen.

A combination of super ripe bananas and lovely, creamy Greek yoghurt, this is the perfect breakfast, lunch, dinner, snacky cake (just eat it all day, everyday – I dare you to stop).

I’ve adapted the recipe slightly and used walnut meal and desiccated coconut for a toasty, extra moist result.

Prep Time – 15 mins + 30 mins baking time

Serves – 4-5

Ingredients

  • 100 ml extra virgin oil (I used 50 ml neutral vegetable oil)
  • 80 gms brown sugar
  • 1 tsp vanilla essence
  • 1 egg
  • 50 gms greek yogurt
  • 100 gms wholemeal/plain flour
  • 70 gms walnut meal
  • 50 gms desiccated coconut
  • Pinch of salt
  • 1 tsp baking powder
  • 1 tsp soda bicarbonate
  • 2 large, extra ripe bananas (mashed)
  • 1 banana and some walnuts for topping

Method

Crazy-About-Cooking-Banana-Bread-Ready-to-BakeLine a loaf tin with some baking paper and pre-heat oven to 180° c.

Combine the oil and sugar together and whisk till fluffy. Add the vanilla essence and the egg, then slowly beat in the Greek yogurt till it is smooth and no lumps remain. Add mashed bananas to the mixture (you can add a little more sugar if the bananas aren’t ripe enough).

Combine all the dry ingredients in a separate bowl. Slowly add to wet ingredients and fold till combined. Be sure you don’t over mix the batter. You can add a little milk while folding if the batter is too dry.

Tip into your prepared loaf pan and top with a banana slices lengthways down the middle. Sprinkle with walnuts or desiccated coconut and bake for 20-25 minutes or until golden.

Serve warm with cream, vanilla ice cream or just by itself.


Crazy-About-Cooking-The Best-Banana-Bread-Served

My aunt once told me that you should always use the ripest bananas to make banana bread. The soft texture and concentrated sugars ensure a strong banana flavour and you end up using half the amount of sugar.

A simple trick to ripen your bananas is to lay them flat on a baking sheet (skin on) and pop them in the oven (200° c) for 10-15 minutes. The skin should turn black and slightly sticky! Mash when cooled and use as directed.

Happy Baking!

Karina


Apple Crumble Pie

Crazy About Cooking Apple Crumble Pie Featured Image

Crazy-About-Cooking-Fresh-ApplesAbout an hour and a half drive from our house is a small town in Australia’s Blue Mountains called Bilpin – home to many wonderful orchards and birthplace of some truly excellent apple cider. Last weekend we decided to take a drive to make the most of the late Autumn sunshine and pick some Pink Lady Apples.

It was a glorious day and the apples were all kinds of perfect.

The biggest question was whether to make apple pie or apple crumble – I couldn’t decide so I decided por que no los dos and combined the two!

Ingredients

Filling

  • 4-5 cups peeled, cored and thinly sliced apple – how much you need will depend on how deep your pie dish is
  • about 2 tsp lemon juice
  • 3 cups water
  • 1 cup tightly packed brown sugar
  • 2-3 cinnamon sticks
  • 1/2 tsp ground nutmeg
  • 1/3 cup cornflour

Crust

  • 2 x 340gm packets vanilla or butter cake mix
  • 1 cup shredded coconut (use desiccated if you don’t have a food processor)
  • 240gm butter, chopped

Crumble

  • leftover base mix
  • 1/2 cup rolled oats
  • 1/4 cup processed bran
  • 2 tbsp shredded coconut
  • chopped nuts if desired

Method

Filling

Sprinkle the lemon juice over the apple slices to stop them from going brown and set aside.

Crazy-About-Cooking-Stewing-ApplesCombine 2.5 cups of the water, sugar and spices in a saucepan and mix well. Slowly bring to the boil, stirring gently with a balloon whisk. Combine remaining water and cornflour and add to pot, and continue to stir so that it mixes in smoothly. Simmer until the mixture starts to caramelise and thicken.

Add apples to saucepan and simmer gently until the apples are tender. Don’t overcook them here as they will cook more in the oven when the pie is baking. Stir every now and then to make sure that it doesn’t stick and that all of the apples are stewing evenly.

Once the apples are done, remove from heat and set aside to cool completely.

Crust

Note: My pie tin is a deep one – if you only have a shallow pie tin, halve the crust ingredients.

Combine all ingredients in a food processor and pulse on high speed until the mixture resembles breadcrumbs.

Crazy-About-Cooking-Apple-Crumble-Pie-CrustSpray your pie tin lightly with oil and press the crust mix into it evenly, making sure you pack it down well. The crust should be nice and densely packed, and extend all the way up the sides of the tin. You should have a good amount of the mix leftover to use as the base for the crumble.

Blind bake the crust for about 15-20 minutes in a moderate oven (180 degrees) or until it is golden brown, turning as needed. The crust will puff up, just press if back down with the back of a spoon or a spatula a few times during the baking time.

Once it’s golden, remove from the oven and set aside to cool.

Crumble

Combine leftover crust mixture, oats, coconut, bran and nuts (if using)  and squeeze into a soft dough. Refrigerate for about 5 minutes while you assemble the pie.

Using a colander or slotted spoon, drain most of the syrup from the apples and reserve in a bowl for later.

Load the pie crust up with apples, break the crumble dough over the top and bake for approximately 15-20 minutes in a moderate oven or until the top is golden brown. Turn the pie as needed so it browns evenly.

Crazy-About-Cooking-Apple-Crumble-Pie-with-Ice-CreamRemove from oven, cool in the tin for about 15 minutes so the crust can ‘set’.

De-pan it, then slice and serve with ice cream and extra syrup drizzled over the top.

Best Ever Peach Kuchen

Crazy-About-Cooking-Best-Ever-Peach-Kuchen-featured-image

Fast and easy to make, this not-too-sweet tart is sure to become a family favourite. You can substitute almost any soft fruit for the peaches if you prefer – stone fruits and berries work particularly well.

And yes, it is made using a packet cake mix! I usually get the cheapest 79-cent home brand one.

Crazy-About-Cooking-Best-Ever-Peach-Kuchen-post-imageIngredients

Base
  • 1 x 340g packet vanilla or butter cake mix
  • 1/2 cup desiccated coconut
  • 120gm butter
Filling
  • 250ml carton sour cream
  • 1 large egg
  • 3 tbsp caster sugar
  • Tinned peaches (or other soft fruit)
  • Cinnamon to dust

Method

Combine the cake mix, coconut and butter in a food processor and mix until the mixture resembles breadcrumbs. Alternatively, you can rub the butter in by hand if you prefer.

Press into a lined slice tin or a flan tin with a removable base if you have one. Cover the base and the sides of the tin.

Bake at 180 degrees for 15 minutes. The mix will puff up a bit – don’t worry about that, just press it back down with the back of a spoon or a spatula. You can also blind bake it if you have baking paper and beans or rice, I’ve tried both ways and it doesn’t seem to make too much difference.

After the base has turned pale gold, remove from the oven and let cool slightly. It’s important that the base has started to turn golden otherwise the filling will seep though too much.

Open your carton of sour cream and crack the egg right into it. You can use a bowl if you’re a big fan of washing up, but you can mix it just fine in the carton if you’re lazy like me.

Whisk the egg and the sour cream together and add in the caster sugar. Let sit for a couple of minutes while you arrange the peaches on the base.

Depending on how deep your tin is you may want to cut the peach slices in half again to make them thinner. Arrange them as prettily as you want or just lob them in over the cooled base.

Pour the wet mix over the top of the peaches, sprinkle liberally with cinnamon and pop the kuchen back in the oven for about 15 minutes or until the filling is set and slightly golden on top.

If you’re using a tin with a removable base, you may want to sit it on a baking sheet to stop any liquid dripping onto the bottom of your oven (I speak from experience here – is there anything more disappointing than having to spend an hour cleaning the bottom of the oven after you’ve finished baking??).

Let cool in the tin, then slice as desired. Can be served with ice cream or cream or all by itself.

Crazy-About-Cooking-Mini-Peach-Kuchen
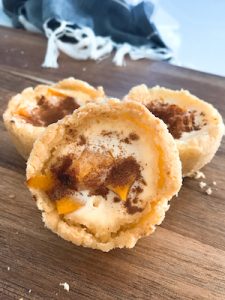
Kuchen stores well in the fridge and is great for lunchboxes.  You can also freeze individual serves pretty successfully and it’s actually kind of nice frozen as well – like a custardy ice cream slice.

Sometimes I wind up with some extra base and filling, so I make mini individual kuchens in foil pie tins. Follow exactly the same process but keep a closer eye on them because they tend to cook faster.

Chunky Chewy Choc Chip Cookies

chunky-chewy-choc-chip-cookies-featured-image

Crazy-about-cooking-chunky-chewy-choc-chip-cookies
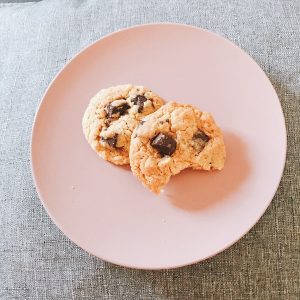
If you’re a fan of chewy cookies and big chunks of chocolate (none of your neat little choc bits here!) and you want the best chocolate chip cookie recipe you’ve ever made look no further for your next treat than these golden drops of pure happiness.

Ingredients

  • 185g butter
  • 1 cup firmly packed brown sugar
  • 1 1/2 cups self raising flour
  • 1/2 cup plain flour
  • 1 egg, lightly beaten
  • 1 egg yolk, lightly beaten
  • 2 tsp vanilla essence or medium dry cooking sherry
  • 200g of dark cooking chocolate, roughly chopped


Method

Melt butter and set aside to cool – it’s important that the butter has cooled before you add it to the other ingredients or it will melt the chocolate and cook the egg in the mix (it’s a rookie mistake – I’ve made it before when trying to rush a batch of these through and it didn’t end well!).

Crazy-about-cooking-combining-sugar-and-flour

In a large bowl combine the flours and brown sugar. I use a whisk to do this as it aerates the flour and breaks up the lumps of brown sugar perfectly.

Whisk the egg and egg yolk together with the vanilla essense or sherry (I ran out of vanilla essence one day and used sherry instead – it worked just as well to add that little bit of depth to the taste).

Blend the egg mix into the butter and set aside.


Crazy-about-cooking-chocolate-chunks


Now for the fun bit – it’s time to chop chocolate. Assuming you bought a big block of cooking chocolate, you’re going to need to cut it into smaller squares. You still want big chunks though – that’s what makes these cookies so great.

Look at those chunks of goodness!


Next, make a well in the centre of your dry ingredients and add the egg/butter/vanilla mix. Fold it through until it makes a soft dough-like mix – don’t worry too much if it seems a little wet at the moment, we can fix that after we add the chocolate if need be.

Add the chocolate chunks to the dough, and mix just enough to distribute them evenly – don’t over handle the mix. It’s not supposed to be perfectly even.

If the mix still seems a little wet you can add a touch more flour – but remember you want the cookies to be nice and chewy, so you don’t want the dough to be too dry.

*Side note: the amount of liquid needed to make a good dough will vary slightly depending on how old your flour is and how you’ve stored it. So sometimes you may need more or less liquid than a recipe calls for.

Crazy-about-cooking-cookie-dough

The next bit is to decide how big you want your cookies to be. They will spread a bit, so make them roughly 1/2-3/4 as big as you want the finished product to be.

Lay them out nicely paced on a tray lined with baking paper. And then, if you want to take the flavour to the next level … sprinkle them with a little Himalayan Pink Salt.

Trust me – it’s divine!


Bake them for about 12 minutes in a moderate oven – that’s roughly 180* Celsius or about 375* Farenheit. Again, how long you bake them will depend on how ‘hot’ your oven runs and how dark you like your cookies. They will still be a little soft when they’re cooked though – they firm up on the rack as they cool. Cool them on the tray for a couple of minutes and then transfer to a wire rack to cool completely.

Crazy-about-cooking-cookies-cooling-on-rack

Get ready to do a lot of hand slapping as the cookies cool – particularly if you have boys in the house 🙂

Once completely cool, transfer to an airtight container. They keep well for about a week – if they last that long!

If by some miracle they last long enough to get a bit stale, you can crumble them up into ice cream for a yummy dessert.


No-Bake Popcorn Pretzel Fudge Bars

Popcorn-pretzel-fudge-bars

Popcorn Pretzel Fudge Bars

This delightful recipe is perfect if you don’t have an oven and want to make something quick to satisfy your chocolate cravings.

Paired with buttery, crushed popcorn and pretzels, the condensed milk and chocolate filling is perfectly balanced with just the right amount of crunch and salty-ness which transforms it into a delightful treat for all.

Prep time – 20 mins + 4 hours for chilling

Makes 10 small squares or 8 medium sized squares


Ingredients 

  • 1 can condensed milk
  • 100 gms unsweetened cocoa powder (or 60 gms for milk chocolate bars)
  • 2 cups plain, salted popcorn
  • 1 cup pretzels
  • 2 tbsps melted butter
  • 1/3 cup thickened cream
  • Popcorn + pretzels to decorate

Method

Line a square baking tin with baking paper. Crush the pretzels and popcorn till the mixture resembles breadcrumbs and mix with a tbsp of condensed milk and melted butter.

Rub the mixture till it sticks together, and flatten on the base of the baking tin. Refrigerate for 30 mins.

Empty the condensed milk into a mixing bowl and microwave for 1 minute (stir at 30 second intervals) so it is not too thick and hard to mix.

Sift in the cocoa powder and fold till incorporated, then fold in the cream.

Pour over base and refrigerate and decorate with pretzels and popcorn when the top is slightly firm. Refrigerate for 4 hours or till the bars are set.


Popcorn-pretzel-fudge-bars
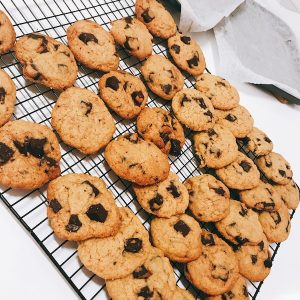
This recipe was created by accident, purely because I had an open can of condensed milk and an intense craving for some golden, gooey, salted caramel.

One of my tried and tested recipes is Dulce de Leche, in which you simply pop a can of condensed milk in a pan full of water and leave it on the stove for a good hour or two.  Since the can was already open, I tipped the milk into a ramekin and proceeded to duplicate the process in a water bath, in the oven.

I’m not going to say it didn’t work, but even after 2 hours, the condensed milk remained quite milky and refused to caramelise further.

The only think I could think of doing was turning it into a delicious chocolate slice. And hence – the fudge bars were born.

The addition of cocoa powder helps to balance the syrupy sweetness, especially when it’s paired with a comparatively savoury base. Add a splash of vanilla, or experiment with crushed peanuts, crackers or even a simple, flaky pastry crush for exciting variations.

Happy Cooking!