Apple Crumble Pie

Apple Crumble Pie

Crazy-About-Cooking-Fresh-ApplesAbout an hour and a half drive from our house is a small town in Australia’s Blue Mountains called Bilpin – home to many wonderful orchards and birthplace of some truly excellent apple cider. Last weekend we decided to take a drive to make the most of the late Autumn sunshine and pick some Pink Lady Apples.

It was a glorious day and the apples were all kinds of perfect.

The biggest question was whether to make apple pie or apple crumble – I couldn’t decide so I decided por que no los dos and combined the two!

Ingredients

Filling

  • 4-5 cups peeled, cored and thinly sliced apple – how much you need will depend on how deep your pie dish is
  • about 2 tsp lemon juice
  • 3 cups water
  • 1 cup tightly packed brown sugar
  • 2-3 cinnamon sticks
  • 1/2 tsp ground nutmeg
  • 1/3 cup cornflour

Crust

  • 2 x 340gm packets vanilla or butter cake mix
  • 1 cup shredded coconut (use desiccated if you don’t have a food processor)
  • 240gm butter, chopped

Crumble

  • leftover base mix
  • 1/2 cup rolled oats
  • 1/4 cup processed bran
  • 2 tbsp shredded coconut
  • chopped nuts if desired

Method

Filling

Sprinkle the lemon juice over the apple slices to stop them from going brown and set aside.

Crazy-About-Cooking-Stewing-ApplesCombine 2.5 cups of the water, sugar and spices in a saucepan and mix well. Slowly bring to the boil, stirring gently with a balloon whisk. Combine remaining water and cornflour and add to pot, and continue to stir so that it mixes in smoothly. Simmer until the mixture starts to caramelise and thicken.

Add apples to saucepan and simmer gently until the apples are tender. Don’t overcook them here as they will cook more in the oven when the pie is baking. Stir every now and then to make sure that it doesn’t stick and that all of the apples are stewing evenly.

Once the apples are done, remove from heat and set aside to cool completely.

Crust

Note: My pie tin is a deep one – if you only have a shallow pie tin, halve the crust ingredients.

Combine all ingredients in a food processor and pulse on high speed until the mixture resembles breadcrumbs.

Crazy-About-Cooking-Apple-Crumble-Pie-CrustSpray your pie tin lightly with oil and press the crust mix into it evenly, making sure you pack it down well. The crust should be nice and densely packed, and extend all the way up the sides of the tin. You should have a good amount of the mix leftover to use as the base for the crumble.

Blind bake the crust for about 15-20 minutes in a moderate oven (180 degrees) or until it is golden brown, turning as needed. The crust will puff up, just press if back down with the back of a spoon or a spatula a few times during the baking time.

Once it’s golden, remove from the oven and set aside to cool.

Crumble

Combine leftover crust mixture, oats, coconut, bran and nuts (if using)  and squeeze into a soft dough. Refrigerate for about 5 minutes while you assemble the pie.

Using a colander or slotted spoon, drain most of the syrup from the apples and reserve in a bowl for later.

Load the pie crust up with apples, break the crumble dough over the top and bake for approximately 15-20 minutes in a moderate oven or until the top is golden brown. Turn the pie as needed so it browns evenly.

Crazy-About-Cooking-Apple-Crumble-Pie-with-Ice-CreamRemove from oven, cool in the tin for about 15 minutes so the crust can ‘set’.

De-pan it, then slice and serve with ice cream and extra syrup drizzled over the top.

Ginger Chilli Chicken Dumplings

Ginger Chilli Chicken Dumplings

Anyone who knows me will testify that I have literally never said no to dumplings. I absolutely love these bite-sized parcels of flavour-laden filling wrapped in light pastry. Although I live in an area with incredible Asian grocers that stock amazing dumplings, I do like to make my own as well. If you’re going to try this recipe I highly recommend getting yourself a dumpling press. It makes forming the dumplings 100 times easier and you can use it for making all kinds of sweet and savoury pastries as well.

Makes 72 wrapped dumplings and a few ‘naked’ ones

Crazy-About-Cooking-Ginger-Chilli-Chicken-DumplingsIngredients

  • 500gm chicken mince
  • 1 handful of soggy old mushrooms (there’s sure to be a few hiding in the back of your fridge!)
  • 1 medium zucchini
  • 3 cloves garlic
  • 1 tsp fresh ginger, grated
  • a few green onions (if you have them)
  • 1 heaped tsp Korean seasoned soybean paste *
  • a cautious amount of chilli shrimp
  • soy sauce to taste
  • 1-2 tbsp dehydrated mashed potato mix
  • 2 x 36 packs of round wonton wrappers

Method

I love a recipe that calls for everything getting thrown in the food processor and this definitely fits that description.Crazy-About-Cooking-Dumpling-Mix

Using the chopping blade, pulse all of the ingredients apart from the wonton wrappers in the food processor until well combined.

At this point, use your nose – the mix should smell gingery, and spicy and salty. Adjust any of your flavours until you’re happy with the smell.

Set a small pot of water to boil. Once it’s simmering, drop a teaspoon of the chicken mixture into the water and wait for it to float to the surface. Give it another 20-30 seconds or so then fish it out and have a taste. If you’re happy with how the flavours come together then you’re ready to make the dumplings. If not, then just add dashes of your different flavourings and keep testing a small amount until if has the flavour you want.

Crazy-About-Cooking-Pressing-Dumplings


Grab your dumpling press and a small cup of water. Place one wonton wrapper in the press and drop about a teaspoon of mixture onto it. Wet your finger and run it around the edges of the wonton wrapper, then fold the press in half and squeeze to seal the edges. Place the dumpling on some baking paper for the seal to ‘set’.


Crazy-About-Cooking-Folding-Dumplings

This next step is optional. Take one dumpling at a time and rest it between your thumb and forefinger with the curved edge fitting into the curve of your hand. Push gently in the middle of the bit where the filling is and then push the two ends together so you’re effectively folding the dumpling in half.

If you have exactly enough mix for all of the wrappers then you should definitely go buy a lottery ticket 🙂


Crazy-About-Cooking-Naked-Dumplings

Usually I have some leftover, so I make some ‘naked’ dumplings – literally just teaspoon sized balls of chicken mix that I poach in either stock or Asian soup base. These can be stored in the fridge (in the liquid) for a few days easily.

These dumplings also freeze well, just make sure you freeze them on trays before portioning them out so that they don’t get all stuck together.

When you’re ready to cook them, drop them in boiling water, stock or soup base. When they float, leave them in the broth for another 20-30 seconds or until they’re cooked through.

Alternatively, they can also be air fried or deep fried (like I wasn’t going to air fry them!)

Crazy-About-Cooking-Korean-Seasoned-Soybean-Paste*Korean Seasoned Soy Bean Paste: where do I start? It’s an umami overload of flavour that adds SO much depth to a dish. I’m not going to say it’s life changing, but if you can get your hands on some it’s definitely going to rock your world. You should be able to find it in a dedicated Korean Grocer, otherwise your specialty Asian shop might stock it as well and it’s totally worth the effort to find it.

Veggie Black Bean Burgers

Veggie Black Bean Burgers

Black beans are my new favourite ingredient. Packed with protein, inexpensive and easy to cook, black beans are versatile and can be used for both sweet and savoury recipes (I tried black bean brownies and my world has changed).

I adapted the Jamie Oliver Black Bean Burger recipe and put my own twist on it by ditching the tomato and caramelising the onions instead of lightly pickling them. Topped with kale, melty cheese and buttery toasted buns, this recipe is a perfect spin on a healthy burger.

Makes 6 burgers | Prep time – 20 minutes

Crazy-About-Cooking-Vegetarian-Black-Bean-BurgersIngredients

  • 2 small onions, sliced
  • 1 red chilli
  • 2 cloves garlic
  • 2 tbsps red wine/ balsamic vinegar
  • 3 tbsps barbecue sauce
  • 2 x 400 gm tinned black beans
  • 2 spring onions, chopped finely
  • 150 gms bread crumbs (or almond meal if you’re gluten free)
  • 2 tsps lemon juice
  • 100 gms kale
  • olive oil
  • sour cream to serve (optional)
  • 6 cheese slices
  • 6 burger buns, cut in half

Method

Heat a frying pan with some olive oil and fry onions till softened. Add in the garlic and chilli. Fry till fragrant and pour vinegar into pan.

Allow the vinegar to evaporate and mix in the barbecue sauce. Cover the pan and leave on a low flame, allowing the onions to caramelise for 15 minutes. Stir the onions so they don’t stick to the bottom of the pan – season according to taste.

Drain the beans and put them in a food processor with salt to season. Blitz till the mixture the beans are crushed. Combine with breadcrumbs, crushed garlic, lemon juice and spring onions. The beans may look dry, but once you start combining the other ingredients, you will notice the mixture is quite wet. Add breadcrumbs till the mix holds together.

Shape into 6 patties, and fry in a shallow pan on either side till brown. Top with cheese and turn off the heat. Cover the pan and allow the cheese to melt while the buns are toasted.

Toast the burger buns and layer with kale, the burger patty, caramelised onions and sour cream if desired. Serve hot with chips on the side.

I used canned black beans because they cut half the cooking time, especially on a long day after work or classes. You can use fresh/dried black beans, but be sure to soak them overnight so they cook faster. Boil/pressure cook with salt for 45- 50 minutes.

The great thing with this recipe is that it can be adapted to suit different tastebuds and choices. You can go the classic route and add plain sliced onions, tomatoes and lettuce, or even top with some garlicky yoghurt and use cumin in your patty for a Mediterranean twist.

Happy Cooking!

Karina

Best Ever Peach Kuchen

Best Ever Peach Kuchen

Fast and easy to make, this not-too-sweet tart is sure to become a family favourite. You can substitute almost any soft fruit for the peaches if you prefer – stone fruits and berries work particularly well.

And yes, it is made using a packet cake mix! I usually get the cheapest 79-cent home brand one.

Crazy-About-Cooking-Best-Ever-Peach-Kuchen-post-imageIngredients

Base
  • 1 x 340g packet vanilla or butter cake mix
  • 1/2 cup desiccated coconut
  • 120gm butter
Filling
  • 250ml carton sour cream
  • 1 large egg
  • 3 tbsp caster sugar
  • Tinned peaches (or other soft fruit)
  • Cinnamon to dust

Method

Combine the cake mix, coconut and butter in a food processor and mix until the mixture resembles breadcrumbs. Alternatively, you can rub the butter in by hand if you prefer.

Press into a lined slice tin or a flan tin with a removable base if you have one. Cover the base and the sides of the tin.

Bake at 180 degrees for 15 minutes. The mix will puff up a bit – don’t worry about that, just press it back down with the back of a spoon or a spatula. You can also blind bake it if you have baking paper and beans or rice, I’ve tried both ways and it doesn’t seem to make too much difference.

After the base has turned pale gold, remove from the oven and let cool slightly. It’s important that the base has started to turn golden otherwise the filling will seep though too much.

Open your carton of sour cream and crack the egg right into it. You can use a bowl if you’re a big fan of washing up, but you can mix it just fine in the carton if you’re lazy like me.

Whisk the egg and the sour cream together and add in the caster sugar. Let sit for a couple of minutes while you arrange the peaches on the base.

Depending on how deep your tin is you may want to cut the peach slices in half again to make them thinner. Arrange them as prettily as you want or just lob them in over the cooled base.

Pour the wet mix over the top of the peaches, sprinkle liberally with cinnamon and pop the kuchen back in the oven for about 15 minutes or until the filling is set and slightly golden on top.

If you’re using a tin with a removable base, you may want to sit it on a baking sheet to stop any liquid dripping onto the bottom of your oven (I speak from experience here – is there anything more disappointing than having to spend an hour cleaning the bottom of the oven after you’ve finished baking??).

Let cool in the tin, then slice as desired. Can be served with ice cream or cream or all by itself.

Crazy-About-Cooking-Mini-Peach-KuchenKuchen stores well in the fridge and is great for lunchboxes.  You can also freeze individual serves pretty successfully and it’s actually kind of nice frozen as well – like a custardy ice cream slice.

Sometimes I wind up with some extra base and filling, so I make mini individual kuchens in foil pie tins. Follow exactly the same process but keep a closer eye on them because they tend to cook faster.

Zuggets (AKA Zucchini Nuggets)

Zuggets (AKA Zucchini Nuggets)

You know how sometimes there are recipes that you just can believe taste as good as they do? This is one of them. Even if you’re not a zucchini fan, you’re pretty much guaranteed to like these zuggets. Is ‘zuggets’ a word? It is now. But maybe not if you’re trying to get a triple word score in Scrabble 🙂

Crazy-About-Cooking-ZuggetsIngredients

  • 2.5 cups grated zucchini
  • 1 medium onion, finely minced
  • 1/4 cup breadcrumbs
  • 1/2 cup dehydrated mashed potato mix ( I like the Aldi one)
  • 1/2 cup grated sharp cheese (something with a good strong flavour, like cheddar)
  • 2 eggs, beaten
  • Herbs – you can use fresh or dried, Italian mix or Greek mix or any other kind of herb seasoning you want
  • Salt & pepper

Method

Crazy-about-cooking-grating-zucchini

Grate the zucchini and then squeeze as much liquid as you can from it – smooshing it in a colander is probably the easiest way to do this.

Crazy-About-Cooking-Mincing-Onions
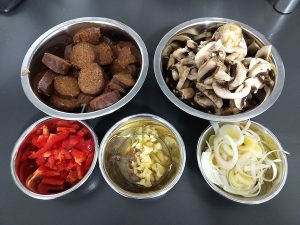
Mince the onion finely. Try not to cry. Cry a lot.

Place all of the ingredients in a bowl and mix well to combine.

Crazy-About-Cooking-Forming-Zuggets


Form tablespoons of the mix into nuggets and leave for about 10 minutes to ‘set’.

Cooking

“Can we air fry it?”

Yes, we can!Crazy-About-Cooking-Air-Frying-Zuggets

Air fry for about 15 minutes at 190 degrees or until golden and crispy on the outside. Depending on your air fryer you may need to spray the basket with oil to prevent them from sticking.

Alternatively, if you haven’t enriched your life by purchasing an air fryer yet, you can put them on an oven tray covered in baking paper and bake them for about 15 minutes in a moderate oven.

Or, if you want some extra crunchy golden goodness, you can shallow fry them for a few minutes or even deep fry them.

My preference is the air fryer because:

a) I LOVE my air fryer

b) It delivers a crunchy golden outer with soft fluffy filling using virtually no oil

Serve with dipping sauces if you like, but honestly, they are pretty amazing on their own.


Makes about 24, depending on how large you make the nuggets.

Peanut Butter Banana Bliss Balls

Peanut Butter Banana Bliss Balls

Bliss balls (just a cute name for them really) are essentially healthy, rolled up versions of raw granola bars. Deceptively easy to make, they are nutritious, filling and can be made using multiple flavour combinations. For this version, I used a slightly ripe banana, a nice scoop of peanut butter and rolled it in cocoa powder for a chocolatey kick. I used almond meal for structure, however you can use crushed peanuts or a handful of oats too!

Crazy-about-cooking-peanut-butter-bliss-balls

Prep time – 15 minutes  |  Makes 8-10 bliss balls, depending on size

Ingredients

  • 1 slightly ripe banana
  • 1/2 cup almond meal (or more, depending on texture), plus extra for coating
  • 1/2 cup instant oats
  • 2 tablespoons peanut butter
  • 1 tsp. chia seeds
  • 2 tbsps. honey (for a vegan version use maple syrup or rice malt syrup)
  • 2 tbsps. desiccated coconut (optional)
  • Cocoa powder, for coating

Method

Mash the banana with a fork and mix the honey and peanut butter in it.

Add the almond meal, oats and chia seeds in small batches and fold until incorporated.

The mixture should be like a slightly sticky dough that holds together when pressed.

Scoop out even spoonfuls and roll the mixture into balls (use a dab of coconut oil on your hands to prevent it from sticking to your palms).

Once this is done, place on a tray/plate lined with baking paper and refrigerate for 20 minutes.

Take the bliss balls out and roll them in some cocoa powder and sprinkle with almond meal or desiccated coconut as desired.

If you’ve grown up in India, your mom probably forced you to eat almonds every morning, rain or shine. My mother maintains that these 6, vital almonds are the sole reason I have a good memory (of course we don’t mention the time’s tables I was made to memorise). In conclusion, I got to a point where I realised I looked forward to my daily dose of nutrition, and actually loved how almonds tasted. Fast forward 15 years and I’m constantly looking for creative ways to include them in my recipes.

After moving to Australia I tried proper almond milk for the first time, and it slowly became one of the staples in my fridge. It’s light, slightly sweet and nutty, and is a versatile base for milkshakes, overnight oats and chia puddings too. And of course, there’s almond meal. I call it my cheats flour because I use it while baking 90% of the time. It guarantees a fudge, softer texture and always tastes amazing. Of course you can substitute it for hazelnut, coconut or even walnut meal depending on what flavours you are going with.

Alternatively, try making your own nut butters and swap out the peanut butter as desired.


Happy Snacking!

Karina

Not Empanadas

Not Empanadas

Before everyone gets all crazy about the name, let me start by saying that I’m not claiming that these little parcels of deliciousness are empanadas, but that they ARE inspired by them. Sure I could just call them ‘savoury meat parcels’ but where’s the fun in that?

crazy-about-cooking-not-emapandasIngredients

  • 500gm beef mince (Don’t like beef? You can use chicken, lamb, pork … it’s up to you)*
  • 1 onion, finely chopped
  • Whole garlic cloves – as much as you like. I use about 3-4 cloves, but I really like garlic
  • Tomato paste – use the best you can get. How much you use will depend on how good it is.
  • 1/2 cup stuffed green olives, roughly chopped
  • 1/2 cup frozen peas
  • Salt & pepper to taste
  • Puff pastry – if you’re really keen you can make your own, but honestly, the shop bought stuff is just fine
  • Egg wash or milk
  • The secret ingredient : pomegranate molasses

* Vegetarian? You can substitute TVP mince in this recipe – you just need to cook the mix down a bit longer for the flavours to absorb better.

Method

Saute the onions in a little oil or butter over a medium heat. Don’t let them get too browned – you want them more soft and golden. After about 5 minutes toss the whole garlic cloves in there with them. Keep stirring, it’s important they don’t stick. After the onions are done to your liking, add the mince to the pot in small batches to brown it nicely. Once crazy-about-cooking-empanada-parcels-tomato-pastebrowned, add the tomato paste. Again, how much you use will depend on how good it is – the stuff we have is insanely good. It’s so thick and rich that you only need a little bit, but if you’re buying supermarket brands you’re probably going to need a good couple of tablespoons.

Once that’s mixed in nicely, throw in those chopped olives, the frozen peas and add a little water (or red wine) if the mix is a little dry – just a tablespoon or so though, you don’t want it getting too runny or your pastry will be soggy. Lower the heat and let the whole thing stew along nicely for about 15 minutes, stirring it every now and then so it doesn’t stick to the bottom of the pan. Remember, if you’re using TVP mince, you’ll probably want to let it cook a little longer so the flavours really absorb. Just keep the heat nice and low.

Next, fish out those garlic cloves – they should be nice and squishy by now. Transfer them to a chopping board and crush them with the side of a knife to make a paste. Add that back to the mix and season with salt and pepper to taste.

crazy-about-cooking-empanada-parcels-pomegranate-molassesNow it’s time to add the secret weapon: pomegranate molasses. If you’ve never had it before, it is amazing. It really is a total explosion of flavour and it adds SO much depth to a savoury dish like this (I’ve used it in bolognese sauce as well and it’s a real game changer). Add about 1 tsp of pomegranate molasses to the mixture and give it all a good stir to distribute the flavours.

Turn off the heat and set aside to cool. If the mix is too hot, the pastry will get all melty, so make sure it’s good and cool.

Grab your pastry – if you’re using shop-bought sheets, peel one off at a time and leave the others under a damp cloth so they don’t dry out. Cut the sheet into 4 squares, and have a small bowl of cold water close by. Add a dollop of the cooled mixture to the centre of one of the squares and dip your finger in the bowl of water and run it around the edges of the square. Next pull two opposite corners of the pastry up to meet in the middle and squeeze them together gently. Hold that point with one hand and bring up the third corner to meet them, squeezing the ‘seam’ together as you go. Repeat with the final corner. Brush your parcel with egg wash or milk. And set aside while you repeat the process till you run out of pastry or mix or (hopefully) both.

Now you have all your little parcels made, it’s time to decide how you’re going to cook them.

crazy-about-cooking-not-emapnadas-air-frying
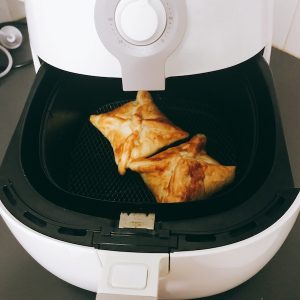
Anyone who knows me will tell you how in love I am with my air fryer. And I confess, I may have gone through a phase of asking, ‘Can we air fry that?’ about practically everything. (Who am I kidding … I’m still doing that!) Well, if you love your air fryer as much as I love mine, you’re going to be thrilled at how well these turn out when they’re air fried.

Air fry them at about 180 degrees for 8-10 minutes. Obviously, some air fryers may be cook a little differently, so check your first batch partway through cooking to see how they’re progressing.


crazy-about-cooking-not-empanadas-close-upAfter about 10 minutes they should look something like this …

Just LOOK at that golden puffiness! >>>

Alternatively, if you don’t have an air fryer, you can pop them in the oven at 180 degrees Celsius (375 degrees Farenheit) for about 10-12 minutes. Again, every oven is different, so check partway through cooking to see how they’re going.

Let them cool slightly before you bite into them – they will be blisteringly hot inside. Trust me on this, you don’t need to learn it for yourself the hard way.

Lentil Stew with Sujuk

Lentil Stew with Sujuk

When it’s cold and miserable outside and I need some comfort food that warms you up and sticks to your ribs, this is one of my go-to recipes. Lashings of flavour, not too much effort and (if you’re lucky) leftovers for lunch tomorrow. Oh, and did I mention it cooks in one pot?

Ingredients

  • 2 cups green lentils
  • 2 sujuk (decent plump ones)*
  • Mushrooms – a good handful, don’t be asking me weights (okay, 150-200g)
  • Half a red capsicum, unless your partner doesn’t care, in which case go crazy with the colours
  • A handful of sliced leek (whose hand? depends on how much you like leek)
  • 6 plump anchovies or 10 stringy ones
  • 2 garlic cloves
  • Salt and pepper
  • Tin of diced tomatoes (alternatively you could steam, peel and dice your own, but f**k that shit, who  has the time?)
  • 1 cup of stock
  • The best tomato paste you can get

* Sujuk is a cured Turkish sausage but you can use chorizo if you can’t get it

Method

Crazy-about-cooking-lentils-soaking
Actual footage of lentils soaking

Take your 2 cups of green lentils and soak them for at least an hour. I say at least. You could put them in a bowl of water before you go to work or stick’ em in the water and go for a walk. As long as you give them at least an hour.

Oh, probably best to rinse them to get rid of any little bits and pieces; unless you’re playing chip tooth bingo. In which case, carry on.

Chop up your mushrooms and capsicum (that’s a bell pepper for those that call them that).

I don’t care how, you can dice them finely like a chef if you want to show off or hack them with a cleaver. Doesn’t matter because a) we’re not fancy and b) they’re going to be cooked for over an hour so they’ll go nice and soft.

Can I add onions, celery, carrots, blah blah blah? Knock yourself out. Crazy-about-cooking-lentil-stew-ingredients

Slice up your sujuk. Any decent sausage will do. I like sujuk, so I use sujuk.

Bring a medium-sized pot up to heat and throw in a tiny splash of olive oil, the 12 cloves of garlic (sorry, I meant 2. what can I say? I like garlic), the anchovies and add some pepper (although you can add it later if you’re timid).

Once the delightful odour of cooking garlic and pepper starts wafting over you, throw your sliced sausage in.

crazy-about-cooking-lentil-stew-saute-ingredients

It will take a few minutes for the outsides to caramelise, so keep stirring from time to time, or be manly and flick your wrist to flip them over.  Continue after you’ve bandaged your sprained wrist. I throw in a small amount of red wine (nothing but the finest boxed vintage for me) to add a little kick to the caramelising.

Toss in the chopped capsicum and mushrooms and stir them in.

Strain your lentils well and add them to the pot. Add the diced tomatoes. Add the cup of stock, which you have prepared by slowly rendering the finest free range chicken carcass and vegetables over a carefully regulated heat for a day. Alternatively, use a stock cube, it’s cheaper and easier, but does lack snob value.

Now, and this is actually important so actually pay attention: pour enough water in to make sure that the lentils are covered.

Mix in one or two tablespoons of your best tomato paste. The crappier the paste, the more you’ll need to add as it’s never as concentrated in my experience.

Bring the whole pot to the boil with the lid on.

Once it has started to boil, reduce the heat to simmer, take the lid off and walk away. For real, don’t go poking and probing it like a two year old, the food knows what to do. Every 20 minutes or so, give it a stir and walk away again. After 90-120 minutes, have a taste. The lentils should be soft but not mushy and they will have sucked  up most of the water. If they are mushy you can still eat them, just tell your guests they’re having ‘un cassoulet de purée de lentilles’, they’ll think you’re fancy and be too scared to question.

Crazy-About-Cooking-Tomato-Lentil-Stew


Last steps. Add any salt or pepper to flavour and then serve in bowls. If you’re lucky and your partner will allow bread in the house, serve big torn chunks of crusty bread to sop up the juices – don’t be slicing the bread, that’s just weird.

Enjoy!

Chunky Chewy Choc Chip Cookies

Chunky Chewy Choc Chip Cookies

Crazy-about-cooking-chunky-chewy-choc-chip-cookies
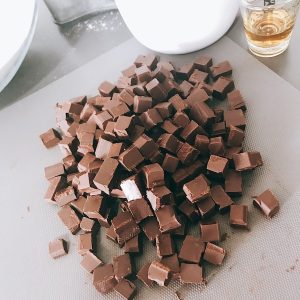
If you’re a fan of chewy cookies and big chunks of chocolate (none of your neat little choc bits here!) and you want the best chocolate chip cookie recipe you’ve ever made look no further for your next treat than these golden drops of pure happiness.

Ingredients

  • 185g butter
  • 1 cup firmly packed brown sugar
  • 1 1/2 cups self raising flour
  • 1/2 cup plain flour
  • 1 egg, lightly beaten
  • 1 egg yolk, lightly beaten
  • 2 tsp vanilla essence or medium dry cooking sherry
  • 200g of dark cooking chocolate, roughly chopped


Method

Melt butter and set aside to cool – it’s important that the butter has cooled before you add it to the other ingredients or it will melt the chocolate and cook the egg in the mix (it’s a rookie mistake – I’ve made it before when trying to rush a batch of these through and it didn’t end well!).

Crazy-about-cooking-combining-sugar-and-flour

In a large bowl combine the flours and brown sugar. I use a whisk to do this as it aerates the flour and breaks up the lumps of brown sugar perfectly.

Whisk the egg and egg yolk together with the vanilla essense or sherry (I ran out of vanilla essence one day and used sherry instead – it worked just as well to add that little bit of depth to the taste).

Blend the egg mix into the butter and set aside.


Crazy-about-cooking-chocolate-chunks


Now for the fun bit – it’s time to chop chocolate. Assuming you bought a big block of cooking chocolate, you’re going to need to cut it into smaller squares. You still want big chunks though – that’s what makes these cookies so great.

Look at those chunks of goodness!


Next, make a well in the centre of your dry ingredients and add the egg/butter/vanilla mix. Fold it through until it makes a soft dough-like mix – don’t worry too much if it seems a little wet at the moment, we can fix that after we add the chocolate if need be.

Add the chocolate chunks to the dough, and mix just enough to distribute them evenly – don’t over handle the mix. It’s not supposed to be perfectly even.

If the mix still seems a little wet you can add a touch more flour – but remember you want the cookies to be nice and chewy, so you don’t want the dough to be too dry.

*Side note: the amount of liquid needed to make a good dough will vary slightly depending on how old your flour is and how you’ve stored it. So sometimes you may need more or less liquid than a recipe calls for.

Crazy-about-cooking-cookie-dough

The next bit is to decide how big you want your cookies to be. They will spread a bit, so make them roughly 1/2-3/4 as big as you want the finished product to be.

Lay them out nicely paced on a tray lined with baking paper. And then, if you want to take the flavour to the next level … sprinkle them with a little Himalayan Pink Salt.

Trust me – it’s divine!


Bake them for about 12 minutes in a moderate oven – that’s roughly 180* Celsius or about 375* Farenheit. Again, how long you bake them will depend on how ‘hot’ your oven runs and how dark you like your cookies. They will still be a little soft when they’re cooked though – they firm up on the rack as they cool. Cool them on the tray for a couple of minutes and then transfer to a wire rack to cool completely.

Crazy-about-cooking-cookies-cooling-on-rack

Get ready to do a lot of hand slapping as the cookies cool – particularly if you have boys in the house 🙂

Once completely cool, transfer to an airtight container. They keep well for about a week – if they last that long!

If by some miracle they last long enough to get a bit stale, you can crumble them up into ice cream for a yummy dessert.


No-Bake Popcorn Pretzel Fudge Bars

No-Bake Popcorn Pretzel Fudge Bars

Popcorn Pretzel Fudge Bars

This delightful recipe is perfect if you don’t have an oven and want to make something quick to satisfy your chocolate cravings.

Paired with buttery, crushed popcorn and pretzels, the condensed milk and chocolate filling is perfectly balanced with just the right amount of crunch and salty-ness which transforms it into a delightful treat for all.

Prep time – 20 mins + 4 hours for chilling

Makes 10 small squares or 8 medium sized squares


Ingredients 

  • 1 can condensed milk
  • 100 gms unsweetened cocoa powder (or 60 gms for milk chocolate bars)
  • 2 cups plain, salted popcorn
  • 1 cup pretzels
  • 2 tbsps melted butter
  • 1/3 cup thickened cream
  • Popcorn + pretzels to decorate

Method

Line a square baking tin with baking paper. Crush the pretzels and popcorn till the mixture resembles breadcrumbs and mix with a tbsp of condensed milk and melted butter.

Rub the mixture till it sticks together, and flatten on the base of the baking tin. Refrigerate for 30 mins.

Empty the condensed milk into a mixing bowl and microwave for 1 minute (stir at 30 second intervals) so it is not too thick and hard to mix.

Sift in the cocoa powder and fold till incorporated, then fold in the cream.

Pour over base and refrigerate and decorate with pretzels and popcorn when the top is slightly firm. Refrigerate for 4 hours or till the bars are set.


Popcorn-pretzel-fudge-barsThis recipe was created by accident, purely because I had an open can of condensed milk and an intense craving for some golden, gooey, salted caramel.

One of my tried and tested recipes is Dulce de Leche, in which you simply pop a can of condensed milk in a pan full of water and leave it on the stove for a good hour or two.  Since the can was already open, I tipped the milk into a ramekin and proceeded to duplicate the process in a water bath, in the oven.

I’m not going to say it didn’t work, but even after 2 hours, the condensed milk remained quite milky and refused to caramelise further.

The only think I could think of doing was turning it into a delicious chocolate slice. And hence – the fudge bars were born.

The addition of cocoa powder helps to balance the syrupy sweetness, especially when it’s paired with a comparatively savoury base. Add a splash of vanilla, or experiment with crushed peanuts, crackers or even a simple, flaky pastry crush for exciting variations.

Happy Cooking!